
Wordpress Themes: upload

Pink Bird WP Theme
|
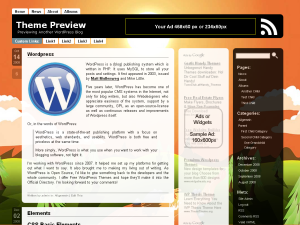
Pinkbird wordpress theme is a simple, clean and elegant wordpress design. It is really minimalist with only one image of a pink bird sitting on a curved branch. The rest of the page is pure white. This is a 3 column wordpress theme. The main content area is placed on the left side while the two sidebars are on the right. The middle sidebar is wordpress widgets compliant. Pink Bird wordpress template was designed by Randa Clay. If you’d rather change this theme to work fit in 800×600 browsers, it’s easy – just follow the directions in the Stylesheet file. Any repeating vertical background image will work with this theme. To change the background image, simply upload the image you’d like to use to the images directory of the theme. Then, find this piece of CSS near the top of the Stylesheet file: and change ‘background.gif’ to the name of the image file you’d like to use. We recommend you don’t use one that is too wide if it is very dark, as the transparency effect will cause the text in your posts to be difficult to read. |


Casino WP Theme
|
Casino wordpress theme is a perfect design for your gambling or gaming related blog. This is a nice and clean 2 column WP skin with header graphic featuring hearts, spades, clubs and diamons made out of polished diamonds. The blog title is just above the pages links (all in the header) followed by main content area on the left side of the middle-section. The main content area is white with barely visible gambling symbols in the background. The sidebar is located on the right side and it is wordpress widgets compliant. Casino wordpress template was designed by wpsite.com You might have noticed on the demo page that theme comes with flash tags cloud and drop down menu. Drop down menu is pre-installed, no need to add anything, just sub pages. Tag clouds require a special plug in to get it working, this will take about 5-10 minutes to set up. Download this plug in http://wordpress.org/extend/plugins/wp-cumulus/ upload it to your plug ins directory and activate. Go to “Settings” >> “WP Cumulus” and set these parameters (otherwise the colors won’t match and the tag cloud will stick out of your column. Width: 250 Other parameters you can modify and adjust according to your own preference. |
Aerodrome WP Theme
|
Aerodrome wordpress theme is a nice 3 column design where the blog owner can chose among many background graphics. This wordpress template was designed by Joe Fischler. Installation: 1) Extract the zip-file on your Desktop Computer 2) Upload your aerodrome directory on your Webhosting Account into the directory /wp-content/themes/ 3) Activate the Theme from your WordPress admin area, click “Appearance” and select the theme Change the background image: Under ‘design’ resp. ‘appearance’ you’ll find the options menu ‘change background image’. Select the background Custom background image: 1.) Get the image you want. Size it to 1024px height to make it fit also for larger screens. 2.) Under ‘design’ resp. ‘appearance’ you’ll find the options menu ‘change background image’. Select ‘default’ and Placing your ads in the theme Open sidebarleft.php and header.php and follow the instructions there |
Massive News WP Theme
|
Massive News wordpress theme is best suited for a magazine type blog. This wp template is full of placeholders for advertisment banners so you can easily edit and put in your own. Massive News wordpress template comes with some plugins included so make sure you put them in your blog’s plugin directory and activate. How to Edit the Ads Different Files have been created to make changing ads through FTP userfriendly. All the files can be found in MassiveNews –> ads. Place your ad codes between the opening and closing Div Tags. How to Add Author Image & Profile Go to Wp-Admin–>Users–>Profile. Upload Image and add Profile details in biography. How do the Author Links Appear on sidebar Go to Wp-admin–>Appearance–>Widgets–>Sidebar2 Create a new Text widget and name it Author List: Staff . Write author login name. Sperate multiple authors with comma and no space (Please make sure you are using the Login Name) Revenue Sharing Go to Wp-Admin–>Users–>Profile. At the end of the page there are boxes for every Author to enter his/her Ad Codes. Gravatars Go to Wp-Admin–>Post. Place the image code inside the “Excerpt” box in the following format <img src=”http://www.wordpresstemplates.com/example.jpg” alt=”Imagename” /> |
Installing WordPress WP Theme
WordPress Installation
WordPress as a blog publishing system is famous for its ease of use and flexibility. Among all the features of the wordpress system, it’s easy and simple installation can be considered as one of its most important virtues. If you are a newbie and are looking to install the wordpress system for the first time, the basic steps are listed below.
In order to install the wordpress system, you first need to know a few things before you can actually begin with installation:
- For a proper installation, you need to have file uplading access (FTP) to your website’s folders on the server.
- You have to be able to access your web server either through shell or through FTP. You normally get FTP access when you apply for online hosting.
- You will need FTP software installed on the computer from which you intend to upload files to the server. Sometimes the hosting will have a web based file uploading system, in which case you can use that instead of FTP.
After you have sorted out the above mentioned points, you then need to do the following:
Ensure that your web hosting meets the minimum requirements needed to run the wordpress system. The server has to support PHP and MySQL. You need the ability to create a new MySQL database. Usually that can be done through your hosting’s online administrator interface (if your webhost company has it, log in and search around for a way to add a mysql database. Otherwise contact your hosting support and ask them to add a mysql database for your wordpress blog – remember the name of the database, you will need it later when configuring the blog)
Step by Step Instructions for WordPress Installation:
- Download the latest version of wordpress and save it on your computer’s hard drive.
- Simply unzip or extract the downloaded wordpress package on your harddisk.
- Create a MySQL database for the wordpress on your web server.
- Once you have created the database, have a look at the unzipped wordpress files. Rename the wp-config-sample.php file to wp-config.php.
- Now that the file has been renamed, you should open the wp-config.php file in the text editor and then fill the required details of the database. (Right click on the file and select “Open With” in the popup windows menu. Then select to open the file with Notepad or Wordpad).
- Now, store these wordpress files in the desired or decided location of the web server (usually the main folder of your website). If you wish to put the wordpress into the root of your domain i.e. (www.yourdomain.com) then you need to upload all the unzipped wordpress files directly to your server’s root folder (do not put the files into a “wordpress” sub-folder on the server, but rather directly into the root). Else, if you wish the wordpress system to be installed in the subdirectory of your selected website (http://abc.com/blog/) then, just create a folder with your desired name and upload the wordpress files into it.
- Now, open a web browser and go to your blog’s www address. There will be an installation script waiting for you. It will guide you through the rest of the process.
If you have installed the system in the root directory, then the blog should be located on www.yoursite.com, else if you have installed it in a sub-folder, then it should be located in www.yoursite.com/subfolder/
After you have configured everything to meet your requirements, it’s time to download a good wordpress template. Unzip it, and upload all the files (and folders) from the zip file into your blog’s /wp-content/themes/ folder. Each theme should be placed in a sub-folder by itself. So the directlry structure would be /wp-content/themes/themename/(files are here).
That’s It, your wordpress blog is installed, configured and looking great.
Submit Your Theme WP Theme
Please use this form to upload your WordPress theme. If it’s acceptable we will examine it and add it to the site so everyone can download.
Submission Rules
1.) The wordpress theme has to be zipped (.zip file)
2.) The .zip file of your wordpress theme has to include a screenshot.png file, sized 300 x 225 (which is the default wordpress screenshot size).
3.) Your wordpress template may include only one footer link mentioning the designer’s credits. There should be no advertisment, no google adsense / adwords code, no hidden links, no spam, no fishy business whatsoever!
4.) Every template has to meet the WordPress Template Standard Codex
5.) Your WP Theme has to include a properly formated style.css which contains all the standard info like author, theme name, etc..
6.) We reserve the right to add only the themes which we find interesting, attractive and unique
